Version 1.1 · translated article
Importing, exporting, copying and sending robot settings in RoboCam
The screenshots are from the original article, retouched so that the interface text is in English. The untouched originals show the Russian interface.
The previous article about RoboCam described how to control an EV3 robot in first person. But robots and mechanisms are built in many ways and each needs its own unique control layout. If you have developed a new robot, the question is how to share your settings with other people, move them to another smartphone, or simply copy them. There is a solution: the new version of RoboCam adds import, export, copy and send of robot settings.
This article describes the new features in version 1.1 of RoboCam. All the articles about RoboCam can be found here. You can install RoboCam from Google Play, or download the APK and install it manually: the regular version of RoboCam or the version of RoboCam that uses RenderScript (for some older smartphones); both are release 1.4.5. There is also an APKPure mirror.
Exporting settings to a file
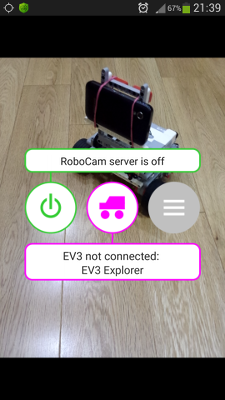
First let's look at how to export settings. Open the RoboCam settings by pressing the grey button on the right.
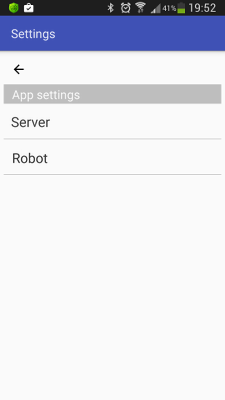
Then choose the «Robot» section.
Choose the settings you want to export, for example «EV3 Explorer».
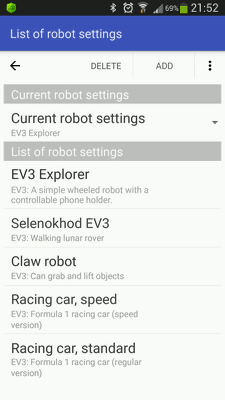
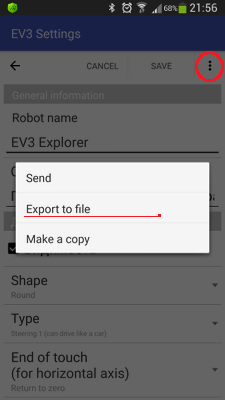
Once the robot's settings are shown on the screen, tap the button with three dots at the top right and choose «Export to file» in the menu that appears.
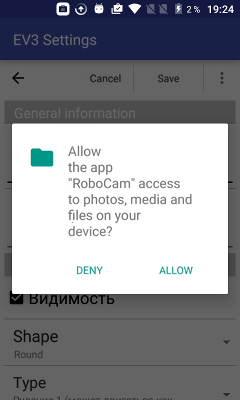
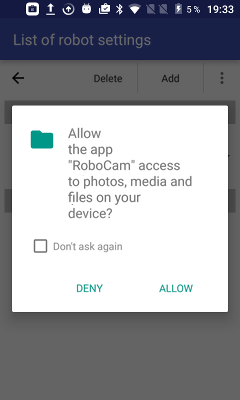
If you have Android 6 or later you may see a request for permission to access your phone's shared folders, see the picture below. As a rule you only need to grant the permission once; Android remembers your choice. Press «ALLOW».
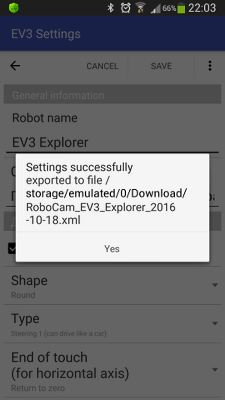
The settings are then written to a file immediately, and a message on the screen tells you where to find it. As you can see, the file is saved in the downloads folder, which on my phone is «/storage/emulated/0/Download». The name always starts with the prefix «RoboCam», followed by the name of the settings and the current date. If the file name would clash, for example if you export the settings a second time in a row, the previous file is not overwritten; a second file is created in the same folder with the suffix 2 in its name, then suffix 3, and so on.
Note that the settings are written to the file together with any unsaved changes you have made. For example, if you open the «EV3 Explorer» settings, change the robot's name to «My EV3 Explorer», export the settings to a file and then close the settings without saving, the file will contain the name «My EV3 Explorer», while the settings themselves keep «EV3 Explorer».
Sending robot settings
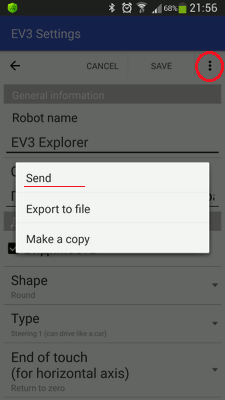
Now let's learn how to send settings to another smartphone over Bluetooth, or by e-mail. As with export, open the robot settings you need, tap the three-dot button at the top right and choose «Send» in the menu.
If you have Android 6 or later you may see a request for permission to access your phone's shared folders, see the picture below. As a rule you only need to grant the permission once; Android remembers your choice. Press «ALLOW».
A dialog then appears for choosing the device or app to send the file with. Not every possible option is listed, only those that can send an XML settings file. The dialog in the picture below will look different on different Android versions. Choose how you want to send the settings file and continue according to your choice and your Android version. For more about sending files in Android, see your device's manual.
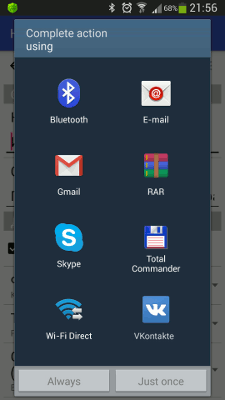
Note that the settings are sent together with any unsaved changes you have made. For example, if you open the «EV3 Explorer» settings, change the robot's name to «My EV3 Explorer», send the settings and then close them without saving, the file sent will have the robot name «My EV3 Explorer», while the settings themselves keep «EV3 Explorer».
Also keep in mind that the file being sent is stored in the folder «/storage/emulated/0/.robocam». If you change the settings and send them again without waiting for the first send to finish, the file will be overwritten and the changed settings may end up being sent twice.
Making a copy of settings
You may want to copy settings if you are making settings for a new robot based on existing ones. Making a copy is very easy. As with export, open the robot settings you need, tap the three-dot button at the top right and choose «Make a copy» in the menu.
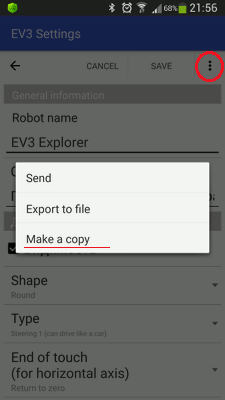
The settings are copied straight away, and you see a message confirming it. Back in the list of settings you will find the copy.
Importing settings
Importing settings is very easy. Say you have downloaded a file and put it in the downloads folder «/storage/emulated/0/Download». Open the list of robot settings and tap the three-dot button at the top right. In the menu that appears choose «Import from file».
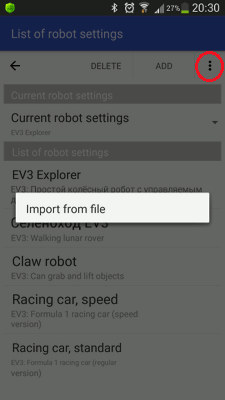
If you have Android 6 or later you may see a request for permission to access your phone's shared folders, see the picture below. As a rule you only need to grant the permission once; Android remembers your choice. Press «ALLOW».
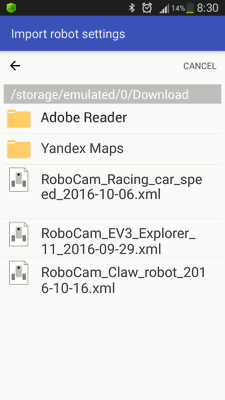
A navigator for your file system then appears. Use it to find the settings file you want to import. Tap folders to open them. Use the arrow or the phone's Back button to leave a folder. The «Cancel» button closes the navigator straight away.
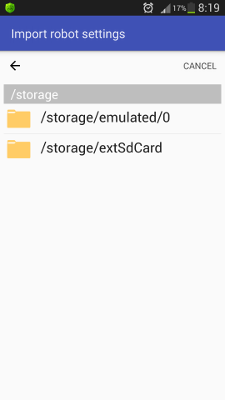
Once you have found the settings files, choose the one to import.
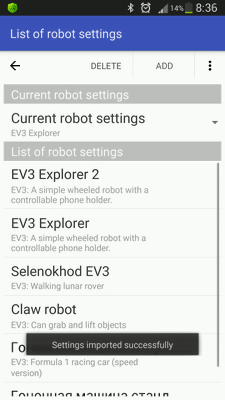
The settings are imported immediately, a pop-up message tells you so, and you will see them at the top of the list. As you can see, the number 2 has been added to the name. If you import the same settings again, the number 3 is added, and so on. After the import the settings are ready to use.
Now that we know how to import settings, here are ready-made settings for a few robots. Videos are also available that show how to drive the robots with these settings.
Settings for driving the Formula 1 EV3 racing car
These settings define three joysticks. The first two are a vertical and a horizontal joystick: one spins the car's rear wheels and the other works as the steering wheel. The third joystick is a second way to drive: with it you control the speed and the turns at the same time. There are deliberately three joysticks so that you can see how switching between joysticks 1-2 and 3-4 works. I fixed the smartphone with two angle brackets and two rubber bands so that the front wheels are in the phone camera's view, which makes it easier to feel the car's dimensions.
Settings files for the standard and speed versions of the car are listed below:
| RoboCam settings for the Formula 1 EV3 racing car | |
RoboCam settings for the Formula 1 EV3 racing car.
|
|
| Date: 22.10.2016 · File size: 892 B |
| RoboCam settings for the Formula 1 EV3 racing car (speed version) | |
RoboCam settings for the Formula 1 EV3 racing car (speed version). |
|
| Date: 22.10.2016 · File size: 900 B |
The build plan and description of the racing car are in the original article «Formula 1 EV3 racing car» (Russian).
Settings for driving the robot with a claw
For the claw robot there is a round joystick and arrows. The round joystick drives the robot's movement, i.e. the wheels, and the arrows work the claw. I fixed the smartphone with several extra parts so that the claw is in the camera's view. That way you can see straight away what I am grabbing and how.
Here is the settings file for the claw robot:
| RoboCam settings for the EV3 claw robot | |
RoboCam settings for the EV3 claw robot. |
|
| Date: 22.10.2016 · File size: 533 B |
The build plan and description of the claw robot are in the original article «LEGO EV3 claw robot» (Russian).
Settings for driving the Selenokhod EV3 (lunar rover)
Driving the Selenokhod is a little more complicated than the previous robots. The joysticks here are arrows. The first joystick only passes the touch coordinates to the EV3 brick (into its mailboxes), and a specially written program inside the EV3 then processes those coordinates. So for the robot to move, you must run the program SelenokhodFPV.ev3 on it before connecting the RoboCam app to the robot. The video also demonstrates a local connection to the RoboCam server, i.e. from the same smartphone.
The settings file and the EV3 program are listed below:
| RoboCam settings for driving the Selenokhod EV3 | |
RoboCam settings for driving the Selenokhod EV3. |
|
| Date: 22.10.2016 · File size: 382 B |
| Helper program for driving the Selenokhod EV3 with RoboCam | |
Helper program for driving the Selenokhod EV3 with RoboCam. Running the program requires LEGO Mindstorms Education EV3 software version 1.1.1 or later. |
|
| Date: 22.10.2016 · File size: 4.56 KB |
The build plan and description of the Selenokhod EV3 are in the original article «Selenokhod» (Russian).
All RoboCam versions
- v1.4.2 Turning a smartphone into a robot remote control with RoboCam
- v1.3.1 Building first-person control for an Arduino robot
- v1.2 RoboCam – controlling a robot in first person from a computer keyboard
- v1.1 Importing, exporting, copying and sending robot settings in RoboCamyou are here
- v1.0 Controlling a LEGO Mindstorms EV3 robot in first person