Version 1.2 · translated article
RoboCam – controlling a robot in first person from a computer keyboard
The screenshots are from the original article, retouched so that the interface text is in English. The untouched originals show the Russian interface.
The new version of RoboCam adds support for a physical keyboard, so you can now control a LEGO Mindstorms EV3 robot in first person from a desktop computer or laptop. In this article I describe how to set up RoboCam to use the new feature, and also what else is new in this version.
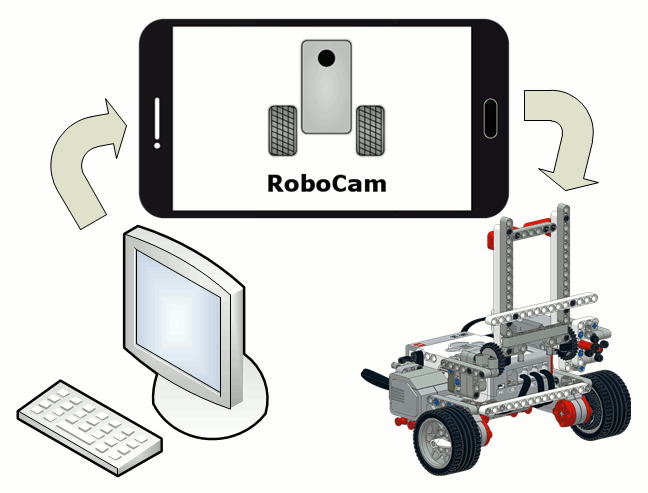
This article describes the new features in version 1.2 of RoboCam. All the articles about RoboCam can be found here. You can install RoboCam from Google Play, or download the APK and install it manually: the regular version of RoboCam or the version of RoboCam that uses RenderScript (for some older smartphones); both are release 1.4.5. There is also an APKPure mirror.
All the changes in the new version concern only the robot settings, so let's go straight to what is new there. Update or install RoboCam, start it and open the settings of any robot. In this article I use the «EV3 Explorer» settings. If you don't know how to open a robot's settings, read the first article about RoboCam.
The first thing that catches the eye is the checkbox «Show debug information». If it is ticked, the client shows the joystick coordinates while a joystick is in use, and the codes of the keys pressed.
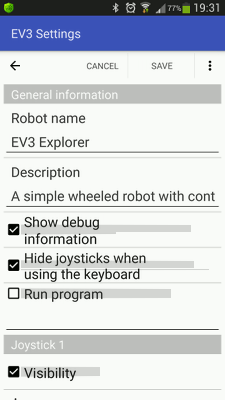
If «Hide joysticks when using the keyboard» is ticked, the joysticks on the client disappear as soon as any key is pressed on the client, so that they don't get in your way. As soon as you click the screen with the mouse, the joysticks appear again.
Automatically running a user program on the EV3
The next setting is useful if, while you control the robot through RoboCam, a user program must run on the EV3 brick — for example one that watches certain mailboxes and drives the motors. If you tick «Run program» and enter the full path of the program file in the field below (for example «../prjs/MyProgram/MyProgram.rbf»), that program starts on the EV3 as soon as RoboCam connects. When the driver client disconnects, the program is restarted.
Programs you create with the official LEGO MINDSTORMS Education EV3 software and download to the EV3 end up in the user projects folder «../prjs». A folder named after the project is created there, and in it a file named after the program with the extension «.rbf». Let's take an example. Say you created a simple project called «MyProject» with a program called «MyProgram», see the picture below. The program shows the text «Hello!» on the screen and hangs in an endless loop.
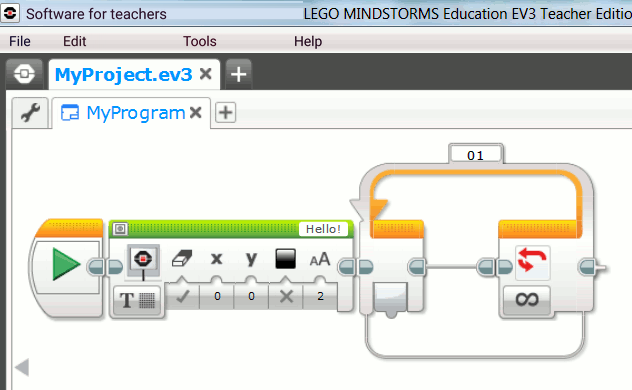
As you can see, the upper tab says «MyProject» — the project name — and the tab below says «MyProgram» — the program name. After the program is downloaded to the EV3, the path to the program file is «../prjs/MyProject/MyProgram.rbf». That is what we enter in the RoboCam settings, see the picture below.
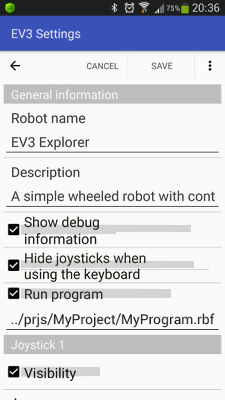
Now, when you connect RoboCam to the EV3, the program «MyProgram.rbf» starts on the EV3 straight away and the text «Hello!» appears on the screen. When RoboCam disconnects from the EV3, the program stops and the menu appears on the EV3 screen again.
Note that the case matters when you enter the full path to the program. If you write a lower-case letter instead of a capital, the program will not start. If you get even one character of the path wrong, the program will not start either.
If some user program is already running when you connect to the EV3, the program given in the RoboCam settings will not be started.
Controlling the robot with a physical keyboard
Besides the settings mentioned above, RoboCam now supports a physical keyboard on the client. Let's see how EV3 robot control from the keyboard works. It works like this. In the RoboCam settings you specify the keys the robot should react to in some way. The client knows about these keys and constantly checks their status, pressed or not. If one of the watched keys is pressed or released, the key's code and its new status are immediately passed to the RoboCam app. Then, depending on the settings, RoboCam either drives the robot's motors directly or sends the key codes to EV3 mailboxes.
Key groups
To divide up the functions given to particular keys, RoboCam uses key groups. The number of key groups is unlimited. To each key group, just as with joysticks, you can entrust either direct control of the motors, or the key codes are simply passed to a mailbox and you leave their processing to an EV3 program.
Scroll the robot settings down to the heading «Key groups». If you are looking at the «EV3 Explorer» settings, two key groups have most likely been added already (the picture below shows key group 1): one for steering the robot (keys W, A, S, D and the arrow keys) and a second for controlling the frame that holds the smartphone (keys Y and H).
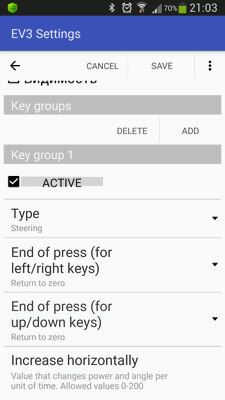
If you updated RoboCam, you won't see the key groups in the «EV3 Explorer» settings. This is because the settings are left over from the previous version, which had no key group support. If you want the configured key groups to appear, delete the «EV3 Explorer» settings; after RoboCam restarts they are created again, this time with the key groups.
You can delete the «EV3 Explorer» settings in one of the following ways:
-
-
- Press the «Delete» button in the list of settings. For this to work the settings must not be the current ones.
- Clear all RoboCam app data in the Android app manager (all your other settings will be lost too, so if they matter to you, export them first and import them again after reinstalling! For how to export and import see the settings article).
- Uninstall RoboCam and install it again (all your other settings will be lost too, so if they matter to you, export them first and import them again after reinstalling! For how to export and import see the settings article).
-
The first checkbox you see in a key group's settings is «Active». If you untick it, the key group becomes inactive, as if it were not there at all. Its settings are hidden in that case, but they are not lost.
Key statuses are checked on the client all the time, even when the keyboard is not being used. So if you plan to use only joysticks, it is recommended to deactivate all key groups so as not to load the client's processor and drain its battery.
Next comes the choice of key group type — the «Type» setting. Each key group can be one of three types: «Independent motors», «Steering» or «Mailbox».
For the «Independent motors» and «Steering» key groups you can set an unlimited number of «up» and «down» keys (let's call them the vertical-axis keys) and «right» and «left» keys (the horizontal-axis keys). You will see how just below.
In an «Independent motors» group the vertical-axis keys can control one motor (motor A below) or several motors, and the horizontal-axis keys another motor (motor B below) or other motors. Motor A does not depend on the horizontal-axis keys, and motor B does not depend on the vertical-axis keys. That is why this type of key group is called «Independent motors».
For an «Independent motors» group, the ports whose motors the vertical-axis keys control and the ports whose motors the horizontal-axis keys control are set separately. With such a key group you can drive, for example, a car where the «up» and «down» keys accelerate and stop the motor that turns the rear wheels, and the «left» and «right» keys turn the motor that steers.
In a «Steering» group the vertical-axis and horizontal-axis keys are linked. Here the ports of the left and right motor are set, and pressing one of the keys turns both motors. For example, if you press «up», both motors turn so that the robot drives forward; if you press «left», both motors turn again, but the left wheel backwards and the right wheel forwards, so the robot turns left.
A «Mailbox» key group also has keys set, but here they do not drive the robot; they are simply passed to the specified mailbox on the EV3. Keys not listed here do not reach the key group's mailbox.
Now let's look more closely at the settings of the «Independent motors» and «Steering» key groups. A little lower you will see the parameters «End of press (for left/right keys)» and «End of press (for up/down keys)», which determine what happens when the user releases a pressed key. As with joysticks there are two options — «Return to zero» and «Keep position».
It works like this. Say that pressing the W key makes two motors of your robot turn and the robot drives forward. If «Return to zero» is set, then when you release the W key the speed returns to zero, the motors stop turning and the robot stops. If «Keep position» were set, the motor would keep turning; that is, after the key is released the speed is kept.
Another example. Say pressing the Y key changes the rotation angle of the medium motor and the frame that holds the smartphone tilts down. In that case, if «Return to zero» is set, when you release the Y key the medium motor's angle returns to zero and the frame turns back to vertical. If «Keep position» is set and you release the Y key, the motor stays turned at the angle it had at the moment the Y key was released, and the frame keeps its position.
The next key group parameters are responsible for the stepwise increase or decrease of motor speed or rotation angle. A key has only two states — pressed or released. Imagine we are driving the EV3 Explorer and press the Y key, and the angle changes by 100 degrees at once. It happens so abruptly that the smartphone attached to the frame could come off and fly away. Or another situation: you press the D key and the robot starts turning right sharply; we only needed to turn a little, but because of the high speed we turned too much.
A robot that behaves like this is not what we want, so with stepwise change of speed and angle we can make keyboard control more comfortable. For example, we can make the robot accelerate gradually while driving and the frame move in small steps. That is exactly how the «EV3 Explorer» settings are made. Let's look at these parameters.
A little lower you will see six fields for stepwise motor control: «Increase horizontally», «Increase vertically», «Decrease horizontally», «Decrease vertically», «Pause between horizontal increases/decreases» and «Pause between vertical increases/decreases».
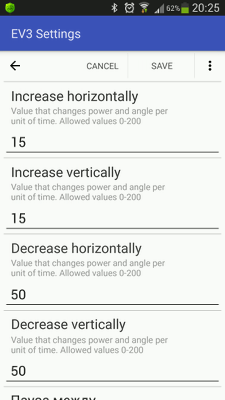
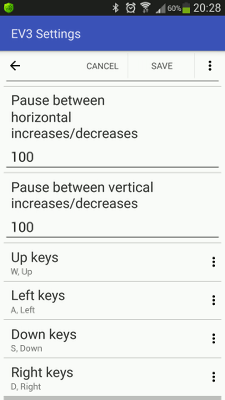
As written above, we have vertical-axis keys and horizontal-axis keys. «Increase horizontally» and «Decrease horizontally» show the step by which the speed or angle of the connected motors changes when the horizontal-axis keys are used, and «Increase vertically» and «Decrease vertically» do the same for the vertical-axis keys. [Translator's note: the original text says “vertical-axis keys” for both pairs; the horizontal pair is clearly meant for the horizontal axis.] «Pause between horizontal increases/decreases» and «Pause between vertical increases/decreases» give the interval in milliseconds between these steps.
Let's work through an example. Say the W key is the «up» key, i.e. a vertical-axis key. Two large motors that turn the wheels are tied to it. In our settings the vertical increase is 15 and the decrease is 50. This means that when we press and hold W on the client, the speed of the large motors increases step by step by 15 units every 100 milliseconds until it reaches the maximum value, 100 units. So the robot accelerates smoothly. When we release W, the speed starts dropping step by step by 50 units every 100 milliseconds until it reaches zero. So the robot also stops smoothly, but much more sharply than it accelerated.
Note that an “increase” here means a change of speed or angle from 0 to 100 and from 0 to -100, and a “decrease” means a change from 100 to 0 and from -100 to 0.
The step values can range from 0 to 200; if you set 0 or 200 the speed or angle changes abruptly rather than step by step.
The pause value cannot be less than 100 milliseconds. Keep in mind that the real pause between steps may be longer than what you set, because there can be delays when commands are sent to the EV3.
With the next four buttons — «Up keys», «Left keys», «Down keys» and «Right keys» — you assign specific keys to control the robot. To set or change the chosen keys, press the button you need. A list of available keys then opens. Choose the keys you want and press the «Done» button.
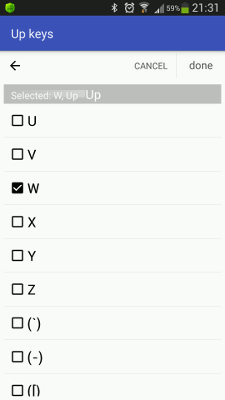
If you connect a physical keyboard to your smartphone you can pick keys with it, by pressing the key you want while this list is open. Not all keys can be chosen this way, though.
Next in the key group settings come the ports. Key group ports are configured the same way as joystick ports, and I won't go into it in detail here. For port settings read the article «Controlling a LEGO Mindstorms EV3 robot in first person».
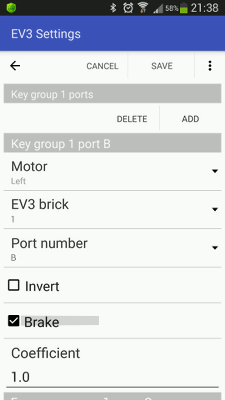
Now let's look separately at the settings for the «Mailbox» key group. If you switch the type to «Mailbox» you will see the settings for this key group change. There will only be «Mailbox name» and «Keys». In the «Mailbox name» field you enter the name of the EV3 mailbox that receives the codes of the pressed keys among those you list below with the «Keys» button. Codes of keys not listed here will not arrive in the mailbox.
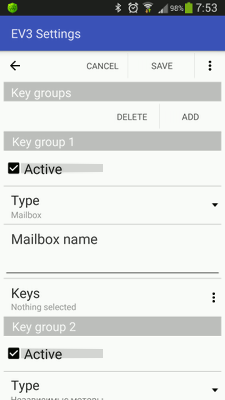
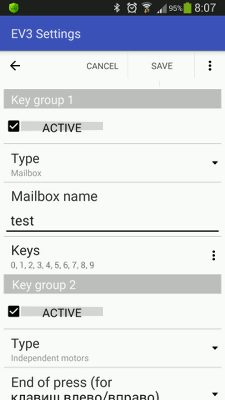
Let's take an example of how to get the codes of the digit keys 0–9 on the EV3. We name the mailbox «test» and specify all the keys from 0 to 9.
Now let's rework the EV3 program we made above as follows, see the picture below. Here we simply show on the screen the key code received from the «test» mailbox. Download the finished program to the EV3.
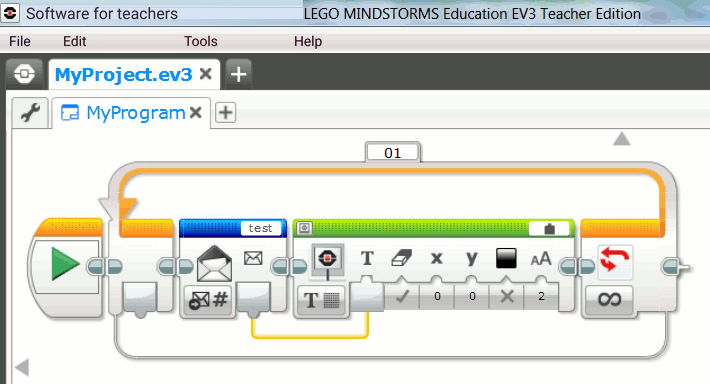
Unfortunately the mailbox block cannot receive an array of numbers, so only the code of the last pressed key is sent to the mailbox, or 0 if the last pressed key was released. So to process several keys independently you need several mailboxes — one mailbox per key.
Once the program is downloaded to the EV3, don't forget to tick «Run program» and enter its path «../prjs/MyProject/MyProgram.rbf».
Now, when you connect RoboCam to the EV3, the program MyProgram.rbf starts on the EV3 straight away and the digit 0 appears on the screen, meaning that no key is pressed. Now start the RoboCam server, connect to it with a browser on your computer and try pressing keys. You will see that when you press the digit keys, the code of the last pressed key is shown on the EV3 screen, and when you press other keys 0 is shown.
Now let's talk about key codes. You can use most keys; their codes mostly follow ASCII. However, there are so-called hotkeys that the browser reacts to in a special way. For example the F1 key opens the browser's help and F5 refreshes the open page. Such keys are not available in RoboCam. The table below lists all the keys you can use with RoboCam, and their codes.
| Code | Key | Code | Key | Code | Key |
| 8 | Backspace | 57 | 9 | 99 | 3 (Numpad) |
| 9 | Tab | 65 | A | 100 | 4 (Numpad) |
| 12 | Clear | 66 | B | 101 | 5 (Numpad) |
| 13 | Enter | 67 | C | 102 | 6 (Numpad) |
| 16 | Shift | 68 | D | 103 | 7 (Numpad) |
| 17 | Ctrl | 69 | E | 104 | 8 (Numpad) |
| 18 | Alt | 70 | F | 105 | 9 (Numpad) |
| 19 | Pause | 71 | G | 106 | (*) (Numpad) |
| 20 | Caps Lock | 72 | H | 107 | (+) (Numpad) |
| 27 | Esc | 73 | I | 109 | (-) (Numpad) |
| 32 | Space | 74 | J | 110 | (.) (Numpad) |
| 33 | Page Up | 75 | K | 113 | F2 |
| 34 | Page Down | 76 | L | 115 | F4 |
| 35 | End | 77 | M | 118 | F7 |
| 36 | Home | 78 | N | 119 | F8 |
| 37 | Left | 79 | O | 120 | F9 |
| 38 | Up | 80 | P | 121 | F10 |
| 39 | Right | 81 | Q | 144 | Num Lock |
| 40 | Down | 82 | R | 145 | Scroll Lock |
| 45 | Ins | 83 | S | 186 | (;) |
| 46 | Del | 84 | T | 188 | (,) |
| 48 | 0 | 85 | U | 189 | (-) |
| 49 | 1 | 86 | V | 190 | (.) |
| 50 | 2 | 87 | W | 191 | (/) |
| 51 | 3 | 88 | X | 192 | (`) |
| 52 | 4 | 89 | Y | 219 | ([) |
| 53 | 5 | 90 | Z | 220 | (\) |
| 54 | 6 | 96 | 0 (Numpad) | 221 | (]) |
| 55 | 7 | 97 | 1 (Numpad) | 222 | (') |
| 56 | 8 | 98 | 2 (Numpad) |
That covers the new functionality in RoboCam. You may also find the other RoboCam articles useful.
All RoboCam versions
- v1.4.2 Turning a smartphone into a robot remote control with RoboCam
- v1.3.1 Building first-person control for an Arduino robot
- v1.2 RoboCam – controlling a robot in first person from a computer keyboardyou are here
- v1.1 Importing, exporting, copying and sending robot settings in RoboCam
- v1.0 Controlling a LEGO Mindstorms EV3 robot in first person